20110606

Week 6

I went out of town on Thursday for a weekend cycling event (my first century!), so my creative time was cut a tad short.
But I finally put together some logo samples for a friend. That counts, right?
While away, I picked up this cool lamp shade frame that will turn up soon. Stay tuned.

20110529

Week 5

May is always a crazy month so I fell back on an old idea for this week. I saw an embroidery similar to this a long time ago and pulled the old, "I could do that" and yet never did.
I finally did. Thanks, weekly project!
Created the artwork in Illustrator and digitized it for my embroidery machine, then stitched this onto felt and sewed it on the sleeve of a shirt I bought for Luke for this very purpose (weeks ago, of course). I thought it needed a little more something so I added some random orange satin stitching along one of the front pockets. Kind of goes along with the distressed military look going on here.
Despite having the tools to embroider a patch outright, it is not necessary. Keep your eyes open for cool embroideries on old clothing items, even silk screened artwork that you can cut & applique onto things. This extra step can take something as simple as this grey shirt and make it grey-oovy! (sorry- had to)

20110523

Week 4

My first pass card!
This is why I was unable to execute some creativity this week. Poor little one broke her arm but all is well and mending.
Perhaps I'll make up for it this week with two projects? :) We'll see.

20110515

Week 3

I decided that this week I would finish something I started at least two years ago. At least!
How pathetic is that! Wait, I should hold back that criticism of myself because I know I have more projects in that stage lurking within my office.... so, to focus on the positive... I am going to complete one soon!
Once upon a time, I traced the shadow of a beautiful eucalyptus tree in our yard onto this canvas and that is how it has stayed. Empty and wanting. So instead of starting a new project, I decided to bust this baby out. Alas, I was not able to complete it, but I think it still counts that I worked on it. Perhaps this coming week I can finish it.
A flaw in these long project lapses is that I can't really remember anymore what end result I had in mind so I am just playing with colors and layering and hopefully it will turn out worthwhile in the end. So far I kind of like the paint by numbers look.


20110509

Week 2

The project this week was to get my tangled necklaces hanging up on something once and for all. It's not the coolest thing I have seen to do, but it is the most ideal for my space (and how many I have- I didn't realize my granny stash!). I needed a way to see them and reach them easily so I decided I needed a long cork board of some kind. Then I changed that idea to particle board so it would be more sturdy.
Enter Home Depot.
For $5, I bought this perfect width, long panel and a tiny package of tooth hangers.
Wrapped it in grey canvas and stapled it with a staple gun, nailed on that hanger and I was done in 10 minutes.
Beautiful, right? Just kidding. But it's functional.

I had these wood push pins I bought at Container Store forever ago and used them. I ended up hammering them in (with the heel of my boot, no less- how apropos!) as I went depending on where/how I wanted to display everything. Bonus- purge items you don't wear anymore.

Ta-dah! Now I have a visual display for inspiration (i.e. reminder of what I own) and no more tangles.

20110502

Week 1 Results

Well, I did it. I kept my goal for the first week, at least. Hopefully I won't get behind on posting my results. I did end up finishing this on Thursday to give as a baby gift for my friend.
I have wanted to make paper maché hot air balloons and thought a little mobile would be good testing ground.
As seen in the previous post, I used strips of paper on water balloons. They turned out well enough but I already want to make another one with some improvements.

I painted them (masked areas w/ masking tape) + embroidery floss and twine for the ropes + little cardstock flags... the more I tried to incorporate ideas, the more I realized I should just stick with the current medium so I stayed with paper. In retrospect, some glitter would have been really fun.

As always, I share these things in hopes to inspire. I'm happy to give further details if you want to try some yourself. Do ask. :)
And I've already recognized one lesson from my experiment in forced playtime...
By giving myself 'permission' to create, I already feel a sense of peace knowing I will be accomplishing items on my to-make-one-day wish list. I've made that day happen. What took me so long? I've been waiting for circumstances to accommodate me but perhaps it has to be the other way around?
(It's also frightening to think that if I can't make it work, if I do fail, then I will prove to myself that I should never have tried. I typed this in parenthesis to keep this doubt from my conscience. I really do hope I prove myself wrong in that regard!)

20110426

Phase One

So far, it's working! :)
My first project is something that's been in my head for a while.
It's not making eggs, I'll give you that hint. But it is paper maché. I want to have one done by Thursday so results will be up fast.

20110425

Let It Begin

Dear Academe readers,
If there are any! I really am not sure. But if there is anyone out there, I need your help.
I have decided that I need more creativity in my life so I have made a new goal for myself to create something once a week. It may be big or small, but I am going to force myself to make SOMETHING.
I know it may sound silly because why would I need motivation to do something that I love?
It's because I have a problem: I talk myself out of it because I feel like there are other things that I should be doing before doing this for myself OR I question the purpose and ask, "Why? So I want to make that, but then what do I do with it?", like I need some kind of validation before I even begin. See? Excuses. And I am sick of it. I have emotional needs to make messes again and ignore common sense.
So I'm going to do it.
I'm starting this week.
This is where you come in. I think a little feedback/accountability will do me good. So if you see something you like or think it should be a doorstop, comment and tell me. Then I'll remember that my promise to myself is public and I can't make another excuse.
Thanks. Here we go.

20110322

Scary Maché

Aren't these awesome?
Made by Sebastian (here is his Flickr group) for a horror experience show. I think they are perfectly executed. Simple, classic and pretty darn spooky. These would make an awesome Halloween decoration.
Or to wear late at night at Walmart.

Found via PumpkinRot

20110304

My Hands Hath Wrought

I gathered a few designs together for a freelance portfolio and thought it would be fun to throw them up here.
I don't know why. Maybe to remember them? My work is usually spread across so many different places that I never see it once it leaves my hands. It's fun to look back.

20110223

Union Jack Pillows

This was one of the crafts that I've been meaning to do for a long time. I finally bought a few colors of fabric paint, got some friends together and we painted Union Jack pillow covers. They were a snap to do - motivating me to try some other designs. I think I got a little carried away with the distressed look but couldn't help myself- it was too fun. I purposely kept the color rough and hollow in areas, but you can apply the paint rather evenly, getting pretty professional results.
I'll post the pic when I get it all sewn up and completed. Maybe I'll get a 'new' looking one painted in the meantime.

20101222

More String

Filled the orders from the Girl Next Door show this past week. I think they turned out pretty well. I really like the green. The pic doesn't justify the size. Each panel is 2' x 2' wide!

20101209

Etsy Time

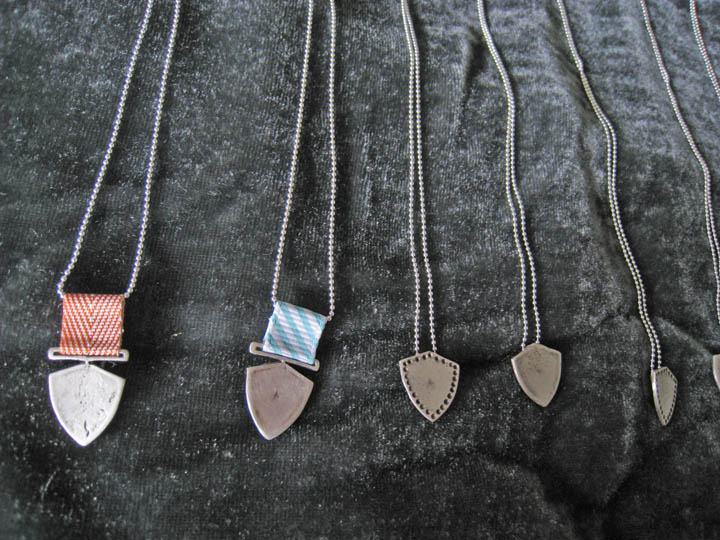
Just opened an Etsy shop if you're interested in some necklaces.
I haven't really planned on opening one but figured... why not?
Now I'm motivated to share more stuff. Stay tuned.

20101204

Honeycomb

Found this 101 on how to make your own honeycomb spheres which I know is crazy when they are practically free already, but I have still been curious to try it.
Now it is saved here so I will!

Instructions

Things You'll Need:

  • 8½-by-11-inch card stock
  • 9 sheets of colored tissue paper
  • Pencil
  • Scissors
  • Glue stick
  1. 1

    Fold the card stock in half horizontally so that its dimensions when folded beome 5 1/2 inches by 8 1/2 inches. Reopen it. Lay it flat on your work surface.

  2. 2

    Draw a simple shape on one sheet of tissue paper that would fit within the dimensions of the full sheet of card stock. For example, draw a circle that is 8 inches in diameter.

  3. 3

    Stack all the layers of tissue paper together and cut out the circle so that you have nine circles of the same size. You can cut the card stock in the same size circle as well, or you can leave it in a rectangle.

  4. 4

    Glue one circle to the middle of the card stock. Make sure the center fold of the card stock bisects the tissue paper circle exactly. You want the card stock's crease to run through the middle of the circle.

  5. 5

    Place four dots of glue on top of the tissue circle that is glued to the card stock. Place the dots around the edge at four spots that are equal distances from each other. For example, if the circle was a clock face, place glue at 12:00, 3:00, 6:00 and 9:00.

  6. 6

    Position a second circle over the first and press down on the glue spots so that it is glued to the first one at those spots. Place glue on the second circle at spots exactly between the glue spots on the first circle. Using our clock face example, you would place glue at 1:30, 4:30, 7:30 and 10:30.

  7. 7

    Place the third circle over the second and press down on the glue spots. Place glue spots on this circle in the same places you glued the first circle, that is, at 12:00, 3:00, 6:00 and 9:00.

  8. 8

    Place the fourth circle on top and press down. Continue this procedure, alternating glue spots on each circle until you have glued eight layers on the stack. Put your four glue spots on the eighth circle.

  9. 9

    Cut the ninth circle in half. Place a half-circle on the right side of the tissue stack. The straight edge should line up with the crease in the card stock.

  10. 10

    Fold the card stock and all the layers along the crease and press down. When you open the card you will have a honeycomb ball.


20101008

Well, Hello there!
Do you recall my earlier post about attempting one of these?
I never did find some cool knit fabric (anyone know of a good online resource?) so I used one of Scott's old cast off shirts to give this a go.
I also stated in said earlier post that some 'ghetto sewing' was in my future. It's all I do. I am a master at ghetto. So pick up your scissors and let's begin.
You can do this with a regular T. The shirt I used here was a polo style.
I used a rotary cutter, ruler and mat. This saves loads of tedious cutting time and keeps your fabric nice and straight but you can do it with regular fabric scissors.
Start by removing the side seams, sleeves and neck trim. Trim close yielding you the biggest piece of fabric you can.

Place those pieces of fabric right sides together and sew the bottom flat edge. Don't have a serger? Neither do I! Find a simple overlocking stitch for knits on your machine. Most have them (T's don't shred much anyway so you could even use a simple knit stitch for stretchy fabric).

Oops- I forgot to even up the shoulders and make them straight (See? Even in ghetto sewing I am a good and wise teacher and include my lame mistakes).

Ruler across the top and swipe! Off with the shoulders and made a straight edge. I didn't go all the way down to the placket. Keep reading to see why.

NOW I have a flat edge on the other end and can sew that together. If you were to lift this up, it should be a 'tube' of continuous fabric with the right sides facing in. Check.
*TIP* I could have cut to the bottom of the placket but I wanted as much length as possible and since we are cutting this into strips anyway, I could get away with this small section of missing fabric. You will see what I mean in a minute....

Now, make sure your 'tube' is completely flat, no folds or wrinkles. One of the seams will remain in tact, the other we will cut through. Lay the seam you are NOT cutting through at the top and begin to cut, one inch apart, from the bottom edge to the top, stopping two inches from the end.

Only that remaining seam will be the spine holding all your strips together.
Now you need to stretch out each loop to encourage the fabric to curl inward. You can do this on the table top but it gets a little tangled after a while so I slid it on my arm, seam on top, and pulled each one down this way.

The strips didn't curl as well where the other seam is. Hence the benefit of using a yard of fabric over a T. But it still works quite well, I say. Maybe after a washing it will help.
Now lay the seam flat and roll it up like a sleeping bag.

Then use a patch from one of your discarded sleeves and sew it around your seam with a quick whip stitch.

Tada! You have enough to double this up around your neck if you want.
I am excited to try some others now. Think of how cool this could look with old concert or vintage t's and even different colored scraps around the spine roll at the end. Are you inspired?! Good. Mission accomplished. Enjoy!