20091214

Bow Softly

Um.... totally radical. That tutorial I linked to earlier about making bows has now been followed up with an additional post where a girl took that idea and made some with felt. Genius. I love it.
And as cool as these look, I want you to think, people. Think of the rad colors of wool felt out there and how you could make great mustard/olive/greyblue varieties.... think of using monochromatic tones like all greens or oranges...
Time to play!

See the links here

20091209

Happy Trees

Another Academe goal accomplished! Remember my recent post to attempt this? Well, I did it and I so enjoyed it that I am here to testify of it's goodness. I'm also here to share what I did in case you'd like to do it yourself because hey, it's Christmas and that's all in the spirit, yo. This is easily done in a night and if you want to embellish, within 24 hours so if you get crack-a-lackin you can enjoy your efforts this year!
Here's how its done:
1) Pick up a bag of Lemax brand trees at Michaels (right now they are 50% off!) in the model train/village section. They come in a bag of 21 (?) assorted sizes. Dark green with white plastic snow all over them (This comes off in the bleaching process)
2) Fill a sink with hot water deep enough to submerge your trees. Add some bleach (approx 1-2 cups per 3 gallons). Use rubber gloves and place your trees in the water. Swish them around and rotate them while the green fades. The process only takes around 10 minutes. Rinse and remove the trees to a towel.
3) Prepare some Rit dye in preferred colors. I used kelly green, fuscia and royal blue. Place the bowls right next to the sink & prepare a towel for the dyed trees to dry. Place one or two trees in the color, make sure you cover all the areas, remove and rinse immediately. I wanted lighter shades so they only needed to be in the dye about 5-10 seconds, sometimes less. Have fun playing with deeper colors or blends.
PS- The trees will take the dye much faster if they are completely dry rather than dying right after this bleaching process. Keep that in mind or your colors may be darker than what you want.
4) Place rinsed trees on towel to dry. Or send them to Belize for a little sun by the pool.
5) I used a glue gun to embellish with some silver accents. If you want to try glitter, I used the Martha glitter glue- just dabbing the brush end of the applicator on the tip of the branches and then rolled the tree on a paper plate with glitter. Ta Da. All sparkles and happiness!

Hope this inspires you to go make your own. Have fun!


GND Holiday Show

The Holiday show this year was so great. It was really fun to get it all ready. I have heard some good feedback and think that overall everyone enjoyed some of the new products and new vendors. There are so many talented artists out there...I love being able to share them with others.

Luckily I had a little time to try a few things out in time for the show. Since I just did all that embroidery for Scott, I only had time to try some some simple designs so I made some pillows, dish towels and patches with that. The leather/silver necklaces were what I was most excited to share and they sold well. And then the bottlebrush trees! I had so much fun doing those that I made a bunch, glittered them and sold them also. I loved seeing those get carried away to peoples homes.
You can see more pictures/read more on the official Girl Next Door site here.
Now I am going to try and clean up my disaster of an office!

20091129

Girl Next Door Show 2009

Sorry for the sparse posting yet again... been busy putting on the Holiday show and creating like mad....
Come if you can to see all the splendor...
I'll post some cool peeks at what I've been doing after the event on Thursday.
In the meantime you can check out the new site I've been working on here.

20091110

Big Headed

This is why you have cool brothers because they show you things like this.
Eric Testroete created an enlarged 3D graphic of his head for his Halloween costume. I think it's one of the coolest things I have ever seen. Click here to learn all about it.


Cool Gifting 101

Um, this is freaking rad.
If you don't think you can make a holiday gift this year, think again! You can at least adorn your prezzie with a cool handmade bow. The link will take you to the directions directly.
So groovy!

Via How About Orange

Schnerenkazoontight

Okay, you know what? I just can't get over how cool some paper cutting designs are. I recently took a class on Sherenschnitte and my teacher has some amazing work on her blog. These are two examples. I can't get over the thin cloud lines... absolutely beautifulbeautiful. So so cool! It plays my Maxfield Parish heart strings. That pirate ship is magnificent! There is just not enough time in this life to do all I want to do. It takes some great practice to master this and have an eye for the art and I am impressed with hers. If you are as well, check out her site- she offers free downloadable templates to practice cutting your own pieces. How cool is that?

20091027

Done!!

While the twins were in preschool they did a little paper maché project and made "dinosaur eggs". After they forgot about them I greedily kept one for this very purpose - to make into a vintage Halloween bucket. Let's just say that this project has been way overdue. My kids are already in Kindergarten and I finally got this done. Finally. It took me less than an hour to do it (+ the two years I've held on to the spotted thing). Living up to my ghetto ways. I am pathetic.
I tell you this because it's really not that significant of a project but more of an inspiration for me to keep attacking my "want-to-do's" and making them my "I-finally-did-it-high-five-to-me!'s".
Onward Ho:
Step One: Take a hollow paper mache bowl...

Step Two: Cut out eyes and mouth with an exacto knife

Step Three: Paint any color you'd like. I was making a pumpkin so I chose a deep orange (Obvious, I know)

Step Four: Draw some eyes and a mouth (I did mine using Illustrator), print/cut out and tape inside.
Punch holes on either side of the large opening on top and add a wire handle...
Yeah, his eyes are a little large. Looks like he's just as surprised as I am that I finally did this thing...

Step Five: Add embellishments. He looked a little bare so I gave him a glittered triangle nose. This part would be fun if you made a black cat with ears or an owl.... Time to encourage my kids to make more dino eggs (i.e. exercise some child labor) so I can make more old school cools.

Step Six: Fill with candy!

20091025

Bottlebrush Trees

Just in time for Christmas. I think old bottlebrush trees are such a cool vintage-y thing to decorate with for the holidays but they aren't that easy to find. Lately I've been looking for sources to buy some and came across a tutorial on how to make your own here.
Nice! I think this makes a great candidate for the next craft night I organize. Who's in?
These are dyed and have snowy effects, but think of all the options: Pastel colors, vintage beads, mica flakes, glitter, paper garlands.... fun fun.

PS- And Halloween trees? I am so making those...

(This first image is from Vintage By Crystal. She has some cool old spun wool art decorations that I LOVE.)

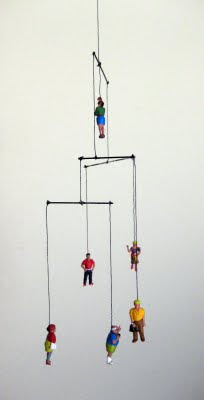
Small Scale

I stumbled across this blog and read her creative idea to make a tiny mobile out of miniature tourist peeps. Thought it was cool and, hey, maybe you would, too.

Mobiles are fascinating to me. I need to make more of them.

20091015

Mask-er-raid

Daaah.... too many things going on!
Many of them Halloween related of course. I've been meaning to post these for a while now. Found them at Michaels and thought they were great! I love the larger face mask- I envision simple painting with wide, dark satin ribbon on each side and hanging on a wall or secured on a stick for a masquerade thing, even wearing one when I hand out candy.... even painted black and alone on a mantel... and best of all, CHEAP. So I kind of raided the stock and bought a good amount.
I've finished the Halloween party invites and am now working on macabre banners, costumes and other such frivolity. I'll try to actually complete something soon and post it here. I still have award ribbons to make. I've got to get off this computer!

20091002

Halloween Banner

Thought I would share how I made banner #2. First of all, high-five cuz I actually went through with something for once. Man, it's been too long since creating and I need to get going.

I had a few friends come over and join me in making this which, I think, is what makes this stuff half the fun. So gather some buddies, share supplies and knock one out.

The chipboard and letters were all from a pack that I picked up at JoAnn's. One of my friends, Sara, brought a simplified banner of letters hung on ribbon from Michaels (from Martha) and added onto that. So work with whatever you want.
The assembly was similar to the banner I did a couple of months ago.
I cut the flags to 4" x 6" and we all covered them differently. I used paper, Jennie used fabric, etc. Using crepe paper again, made different circles or shredded backing for the letters. We glittered the letters and glued them on and then embellished with random things. The flags on each end were covered in paper like the others, then I used large bottle stickers from Martha (via Michaels) on top.
I used three yards of a black trim that I also found at JoAnn's and just hot glued the flags right to it (thanks to Jennie's clear thinking- I was totally overcomplicating it in my mind and think this looks great). Done!
Hope this inspires you to try one.

20091001

Modern Mail


Clever card designs by a.favorite design.
See? I knew tickets were cool.

20090929

Spifalicious

Stumbled across this guys work*- his name is Cheeming Boey. He lives in CA and draws amazing things on foam cups using sharpies. A big step up from the Vans I did last Christmas, eh?
You should really take a few minutes and browse what he's done here.

Here is what he says about his work:
"
drawing on cups is a challenge. unlike a flat canvas, u have to consider compositions from all around. which is what i spend most of my time doing off the top of my head.

i dont do initial drafts on the cup. i do that on paper, but even that is rare, most of the time its a straight shot. part of the fun is not messing up..and that can happen anytime. sometimes, 95% into the work.

how do i mess up? its styrofoam, it charges up easy. lint can stick to it, so can tiny hairs. when it gets caught on my sharpie, and i am not aware of it, a fine point can suddenly become a broad stroke.

if i mess up, i drink out of it.

some cups take a few hours, including what feels like a relatively simple one. some takes months, because i draw something great, and i am afraid of messing it up with the next stroke. so i tend to wait and think for days, or weeks.

i am still constantly refining my strokes. its hard when u get one shot, and u cant undo an error.
but thats also part of why i enjoy it.
i must be some sort of a masochist.

i hope my works can inspire others to think outside the canvas.
its not always what you draw on, its what you draw.

if you look closely, you'll see rom, the cat.
boey
"

*via All About Orange

20090928

InterBike

Attended this show last week with my friend, Erica. It's a trade-only show so it's a good way to test/check things out. I don't really know much about kicking tires and getting down to specifics cuz, you know, I'm a girl and all that... which really means I walk through and point at all that's 'pretty'. :) I really enjoy getting a pulse on what's coming out, observing merging trends and taste testing the electrolyte goodies. No Schleck sitings but at least saw some cool stuff.
Urban bikes are picking up momentum and I snapped a few pics of some I liked. These I think were my favorite of the show, Biomega. WOW. Such amazing design! I really, really admire their attention to every sculpted detail. Modern, clean and tasteful.

Cinelli is a given. They have beautiful, classic styles.

This Masi stopped me in the aisle. Look at those wheels.... aaarhhhllll I drooled a little. So purdy. Complete with a white chain.

Puma has joined with, guess who, Biomega, and made some urban styles. Thought the paint colors were cool. If this doesn't reach some trendy kids, I don't know what will.

Cycle Style

Don't know why, but over the weeks I have collected a few images of people on bikes. Ok- mostly guys with great style...on bikes. I think style is something most people can appreciate. Either people have it or they don't. And the latter is okay, but the former is inspiring so I'm sharing some of them with you.

Plus, a little yum factor is a good thing.... :)

Left: Love this guy sporting old school Sperry's.


And the girl with green wheels waiting by cute-guy with green bike. I like the 'story' in this image. The colors they are wearing help- the muted greys and browns with only green in the bikes. Look at him: suitcoat, brown cords and sand desert books? Well done, I say. What happened next? Do you think ever saw her?

Ah, to be strolling through Euro avenues looking as darling as this girl...


20090822

Retro Patrio

I am such a patriotic person that I decided to make this banner and hang it year round in my house.
Not really.
The truth is I have had the materials for this sitting on my desk since summer began and never got it done so I finally did it this week. Now it's all packaged up and stored away for a year. Ha! It's the ghetto way I suppose. It was really fun to do, though- and now I want to make more. For some reason I've been in a banner mode and been saving ideas. I kept getting ideas to do more to this as I was going, like adding a star behind each letter or little flag ribbon between the letters, or even flags.... but guess what? It's freakin' August and that stuff is not for sale anymore. Which is good because I do that- I get going and get more ideas which hinder completion in a timely manner. So I stuck with the plan and finished it. Hopefully it will inspire you to make one of your own.
Here is a rough breakdown of what I did in case you would like to copy cat:
-The beaded garland was something I bought at a little shop in the spring- I bought two boxes and joined them in the center.
-Glued paper to chipboard (or matboard would work) and cut down to rectangles, then forked the ends.
-Used crepe paper and tissue paper that I edged with pinking scissors, crimped/folded into circles and glued onto the flags (For the glitter edge on the white- I glued glitter on the pinked edge first, let it dry and then glued to the board flags).
-Glittered chipboard letters and glued them to the tissue/crepe circles.
-Hole punched the corners of the board, cut wire pieces and bent into ovals that could slide along the beaded strand with the beads (but not slide into each other, keeping them in place) and looped them through the holes and onto the strand.

Now for some Halloween! (After I clear other crap off my desk. i.e. finish more projects. :))

20090803

Shroom Dreams

Yes. Sometimes I wonder if I am smoking something with the ideas I get. I have wanted to make a mushroom pin cushion for months though I don't know why.... I just liked the idea of a substantial, heavy felt mushroom to place my pins in. And then I got the idea to imitate the delicate ruffles beneath the dome with more felt and uh! I had to make one. It would be so cool, me thinks.
Wellllllll....... let's just say that 'Ghetto sewing by Andrea 101' does not always result in what is in my brain. But I do have enough motivation for more rounds. Cooler colors, taller stems... they could be quite sculptural and interesting. At least, you know, in my brain. But hey-where's the fun if I don't show you my crappy work, too! So here's how to make a goofy mushroom pin cushion. :) Let's get started!
~I made the top- cut out a red circle and started sewing progressive curved seams to create the dome (image uno). Then I filled this with sand and sewed the opening closed (um... do this carefully, making sure you have a good, tight hold on that opening you are closing shut because, you know, sand spilling out into the bobbin area of your machine would not a good thing be ((SEE? I told you- GHETTO SEWING BY ANDREA)).
~ After closing the top, I cut a strip of white felt, hand basted each long side and gathered so the ruffles lined up. Then I hot glued this to the bottom (image dos). Then removed the basting thread. After securing it on there, I tried to pull the outer edge of the dome and glue it to the outer edge of the ruffles. I hope that makes sense. Basically, from the side I didn't want you to see a white thing stuck to the bottom. I wanted the top to wrap completely around the edge and only reveal the white bottom if you turn it over. You know, like a real mushroom.
~I sewed a fat stem and filled it with.... lead shot. Genious, right? I just have to say that this was the one phase that had me stuck for some time. I wanted sand in the dome on top... so what would I use in the base that could possibly be heavy and substantial enough to support that? Cue my dad- Mr. handyman himself acquiring shot for a project of his own. Eureka! The answer I needed to launch the ghetto shroom! Well, it made me so happy. Dorky, I know. Okay, okay- back to the task at hand....
So, you know, just get some of that lead shot you have lying around and fill said husky stem (image tres), fold the top edges down and glue that puppy to the top. "From plus to minus... and minus to plus...!!!!"
~Tada! Aww... look at the fat little guy. He's heavy and happy, pleated and dotted. And he's independant enough to stand on his own. Good boy!